
To begin, navigate to SmartMenu by clicking on the Food Menu Management button and go to the configuration tab. This section gives users the ability to make changes to the menu design at any time. The first option, Background Image, allows you to update the framework of the menu. Simply click Update Menu Background and select the image you would like.

The next customizable item, Specialty Icons, can help draw the attention of customers to special products and enforce branding. To create one, click Manage Specialty Icons, then in the pop-up window click Create. You can then upload an image and set the name. once done, click the checkmark thus adding it to your specialty icon collection.

Next are Photo Indicators; used to display the menu item as either a photo or video. On the menu itself, when a photo indicator is used, the listed item will become a hyperlink allowing customers to view the item as a photo, indicated by a camera, or a video indicated by a video icon. Create an indicator by clicking update photo indicator, then selecting the image or video you wish to use.

Creating a PopUp Menu gives a great opportunity to provide customers with extra information about already listed products and can be used as a means to call out specific items. Click Manage Pop-up menu then Create. For organizational purposes, enter a name then determine the type of product that will be popping up. The start and end position drop-downs designate the area in which your icon/image pops up and when it goes away.

A great example of this is for sauces for a wing section. Rather than take up more room on the menu, you can provide appealing icons that customers click on and an image that appears, such as a heat level scale.

It is strongly advised to be aware of the menu’s organizational structure and time based options to avoid the system accurately knowing what section initially triggers the pop up and when it should no longer appear.
By Clicking on Dietary Preferences, a pop-up window appears allowing you to click Create and upload an image that indicates a specific dietary preference such as if an item contains shellfish or is gluten-free. The image can be uploaded and a name associated with it. To edit this information use the pencil icon or to delete, click on the trash can.

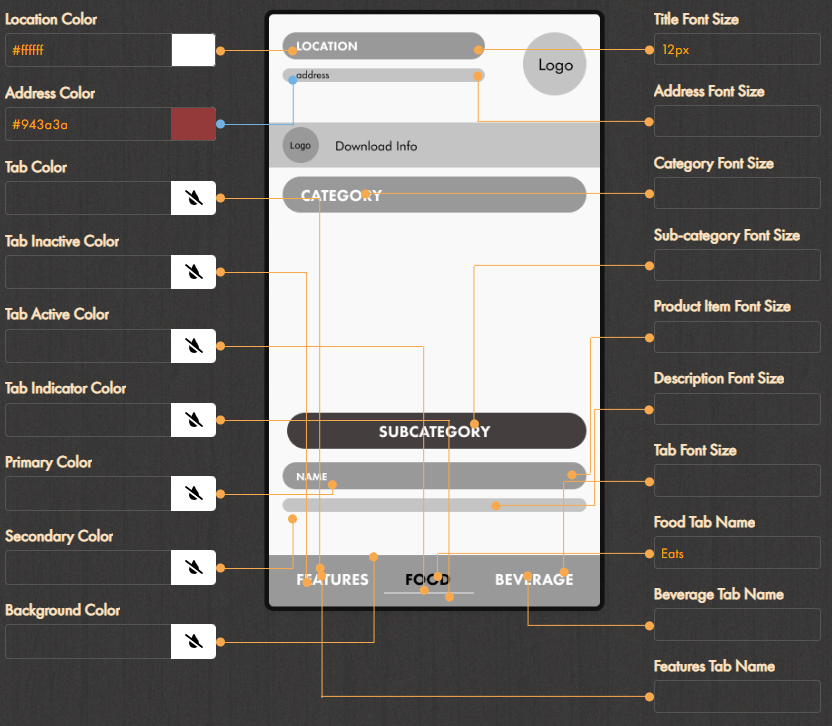
Next, you will be able to fully customize the color scheme and font size of your menu. Each one of these colors, if hovered over, will show you exactly the color you are changing. So this orange is just for the location name. The address is just for the address portion. The tab color is for the tab area. To change the font size, simply enter the numerical size you want followed by the letters px. The tab names can also be updated here.
Finally, you can set up a Daily Change Report Email which provides Users with a report detailing changes that were made to their SmartMenus. Simply input the email addresses that would like to receive those reports, separated by commas, into the Daily Change Report Email field.