---
title: Cocktail Recipe Management (New Dashboard)
description: BeerBoard's Cocktail Recipe builder makes it simple to modify recipes and adjust portions. Once cocktail recipes are saved, liquor cost percentages can be tracked by monitoring ingredient-by-ingredient prices.
---
[Skip to content](https://support.beerboard.com/knowledge/cocktail-recipe-builder-0#main-content)
English
Show submenu for translations

Open main navigation
Close main navigation
- English
Show submenu for translations
- [Contact us](https://share.hsforms.com/1b6jKgzmvTI-oms75xoTasw3vlv9)
[Contact us](https://share.hsforms.com/1b6jKgzmvTI-oms75xoTasw3vlv9)
How can we help you?
- There are no suggestions because the search field is empty.
1. [BeerBoard Knowledge Base](https://support.beerboard.com/knowledge?hsLang=en)
2. [Bars and Restaurants](https://support.beerboard.com/knowledge/bars-and-restaurants?hsLang=en)
3. [Product Management](https://support.beerboard.com/knowledge/bars-and-restaurants?hsLang=en#product-management)
# Cocktail Recipe Management (New Dashboard)
## BeerBoard's Cocktail Recipe builder makes it simple to modify recipes and adjust portions. Once cocktail recipes are saved, liquor cost percentages can be tracked by monitoring ingredient-by-ingredient prices.
Creating and Managing Cocktail (Drink) Recipes in SmartBar
SmartBar lets you build out cocktail recipes for your bar - naming the drink, setting its price, listing every ingredient (including liquor, mixers, and non-alcoholic beverages), and choosing which of your locations pour it. This guide walks through creating a new recipe from scratch, what happens if you try to add the same ingredient twice, and how to delete a recipe you no longer need.
Where to find Recipes
1. From the top navigation, click **Product Management** page .png?width=670&height=146&name=Screenshot%20(234).png)
2. Scroll down to **Product Catalog Management** section 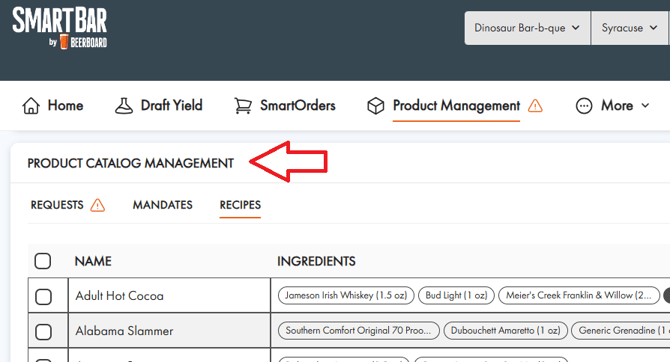
3. Select the **Recipes** tab, next to **Requests** and **Mandates**. 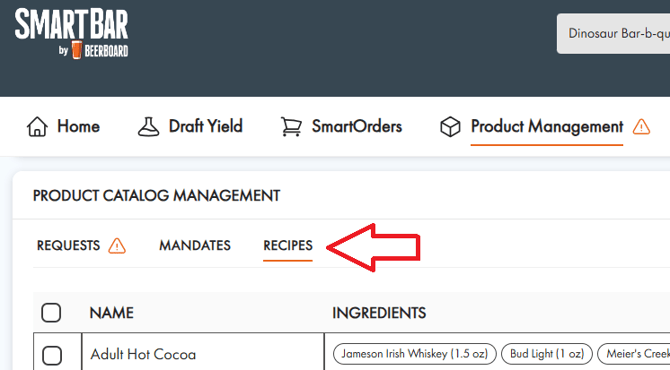
This tab shows every cocktail recipe currently set up for your account, with columns for **Name**, **Ingredients**, **Item Code**, **Size**, **Price**, and **Actions**.

Step 1: Start a new recipe
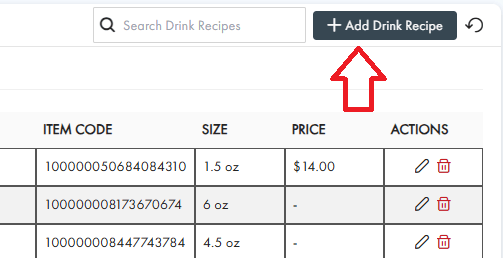
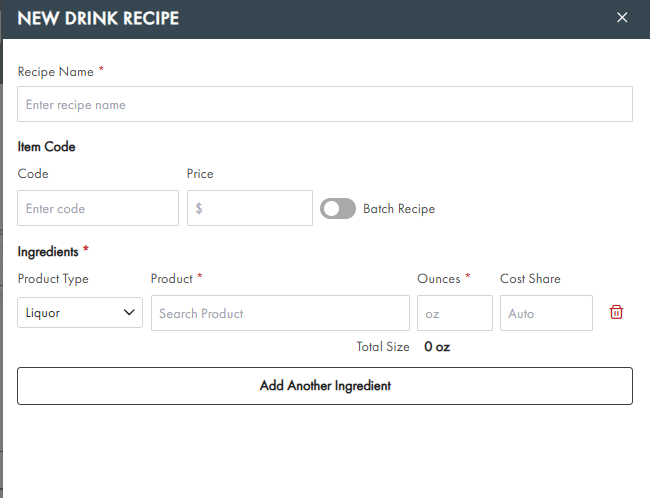
Click **+ Add Drink Recipe** in the top right corner of the Recipes tab. This opens the **New Drink Recipe** panel.
Step 2: Name the cocktail and set its price
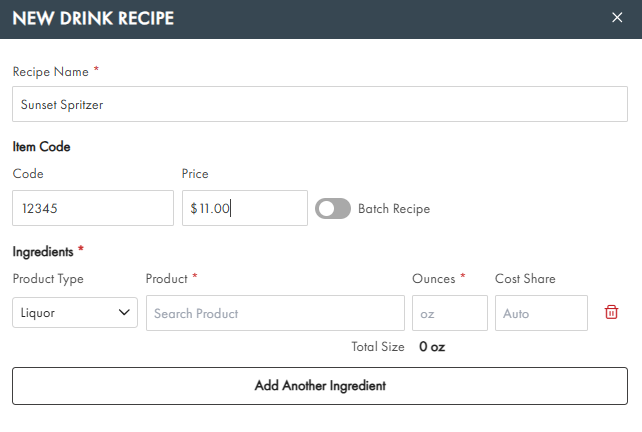
1. Type a name into **Recipe Name** (for example, *Sunset Spritzer*).
2. Under **Item Code**, you can optionally enter a **Code**. Enter the sale **Price** in the field provided.
3. Leave **Batch Recipe** off unless this recipe is a pre-batched mix rather than a drink built to order — toggling it on marks the recipe as a batch.
Step 3: Add ingredients
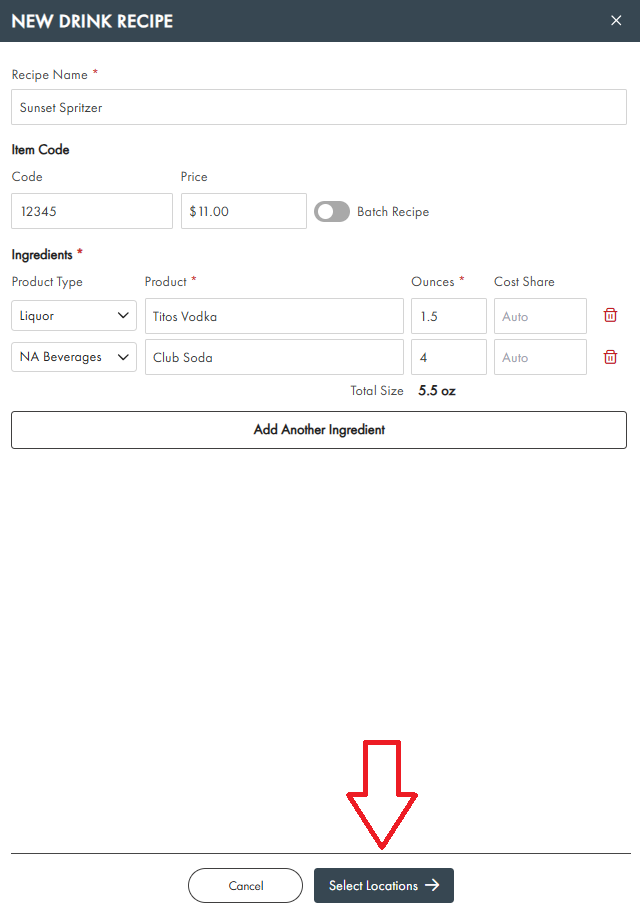
Each recipe needs at least one ingredient. For every ingredient row you'll choose:
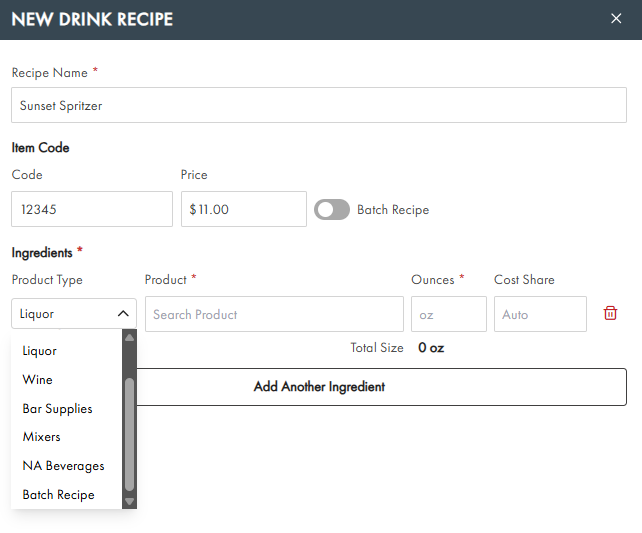
- **Product Type** — the category to search within. Available types include **Draft**, **Package**, **Liquor**, **Wine**, **Bar Supplies**, **Mixers**, **NA Beverages**, and **Batch Recipe**. The newer types — **Mixers**, **NA Beverages**, and **Batch Recipe** — let you build cocktails that include sodas, juices, and other non-alcoholic mixers, or nest one saved recipe inside another, alongside the traditional draft/package/liquor/wine categories.
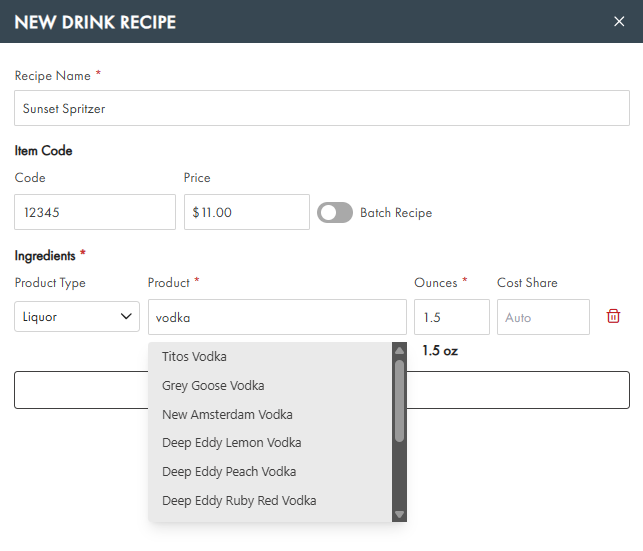
- **Product** — start typing to search within the selected product type and pick from the matching results.
- **Ounces** — how much of that ingredient the drink uses.
- **Cost Share** — defaults to **Auto**, which calculates the ingredient's share of the recipe cost automatically.
To add the first ingredient:
1. Set **Product Type** to **Liquor**, then search **Product** for your base spirit (for example, type "Vodka" and select **Titos Vodka** from the results).
2. Enter the **Ounces** (for example, `1.5`).
To add a mixer like soda:
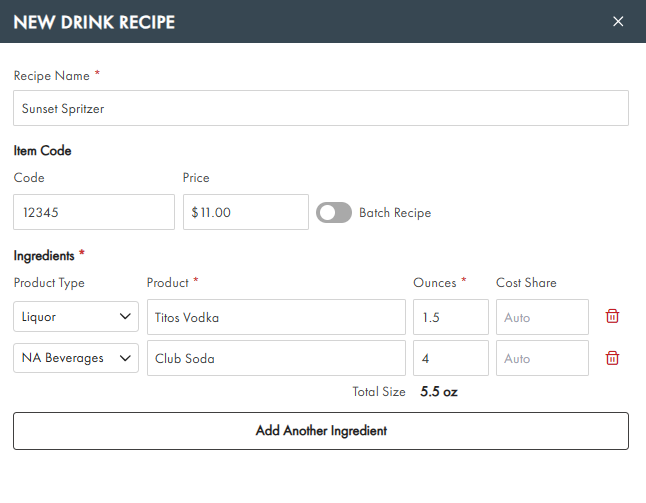
1. Click **Add Another Ingredient** to add a second row.
2. Change that row's **Product Type** to **NA Beverages** (this is where sodas live in the catalog).
3. Search **Product** for "Soda" — you'll see options such as **Club Soda**, **Saranac Black Cherry Soda**, and **Saranac Shirley Temple Soda**. Select **Club Soda**.
4. Enter the **Ounces** for the soda (for example, `4`).
The **Total Size** at the bottom of the Ingredients section updates automatically as you add each ingredient's ounces.
### What happens if you add the same ingredient twice
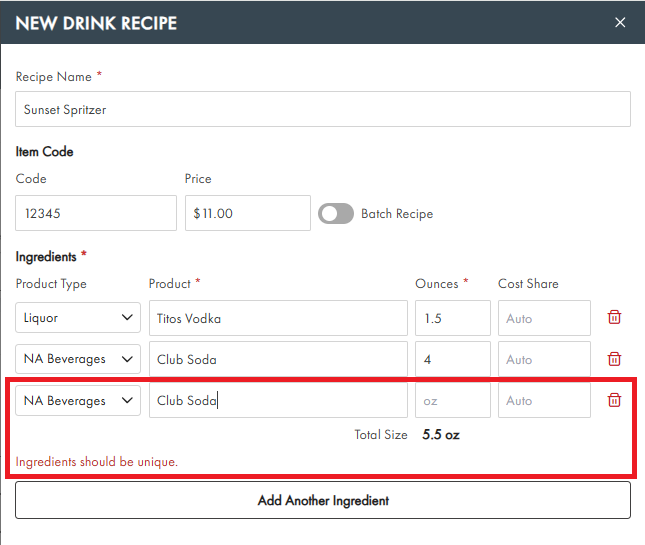
If you try to add an ingredient that's already in the recipe, SmartBar will not let you save it. For example, adding **Club Soda** a second time displays a validation message directly under the Ingredients list:
> **Ingredients should be unique.**
Remove the duplicate row (using the trash/delete icon on that row) before continuing.
Step 4: Choose which locations carry the recipe
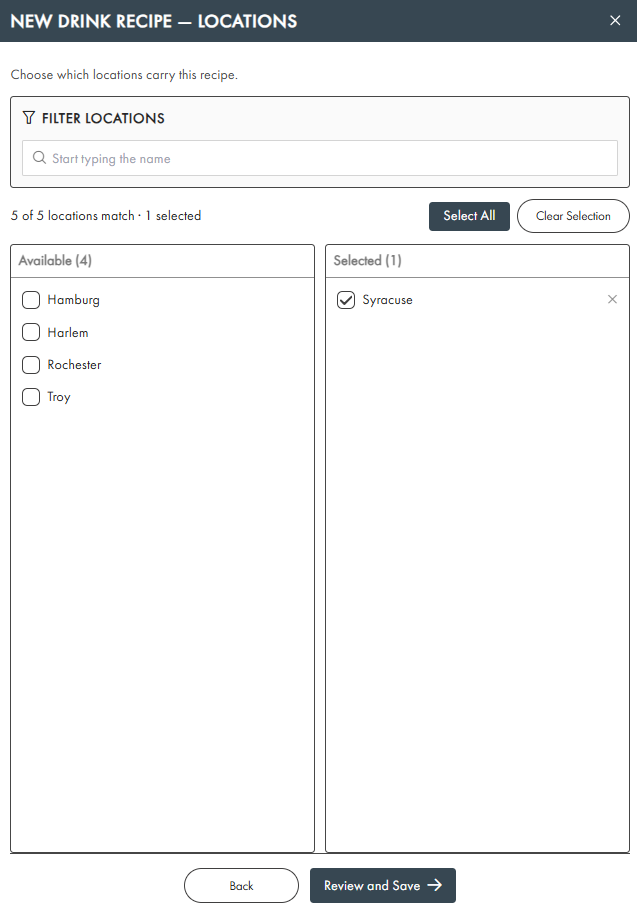
Once your ingredients are set, click **Select Locations** at the bottom of the panel. This opens the **Locations** screen: "Choose which locations carry this recipe."
1. Use **Filter Locations** to search by name, or click **Select All** to apply the recipe everywhere.
2. Click the checkbox next to each location you want (for example, **Syracuse**). Selected locations move into the **Selected** column on the right, and you can remove one by clicking the **×** next to its name.
> 📷 **Screenshot:** The Locations screen with Syracuse checked and moved into the "Selected (1)" column.
Step 5: Review and save
Click **Review and Save** to see a final summary before the recipe is created. This screen shows:
- **Recipe** — name, item code, price, and whether it's a batch recipe
- **Ingredients** — each ingredient, its product type, ounces, and cost share
- **Locations** — every location the recipe will be assigned to
Each section has an **Edit** link if you need to make a change before saving.
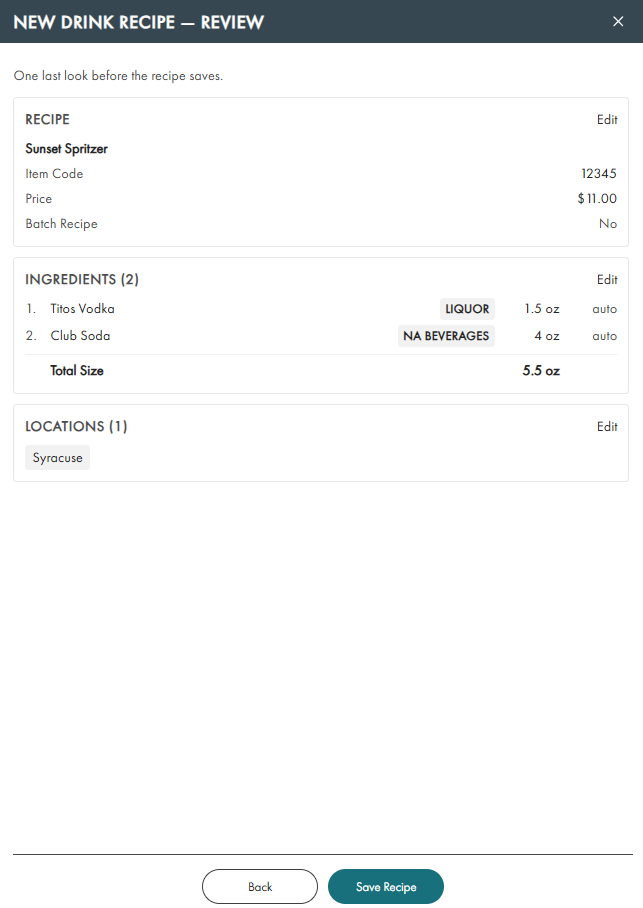
Click **Save Recipe** to finish. A confirmation dialog appears — *"\[Recipe name\] was saved to the current location."* Click **Done** to close it.
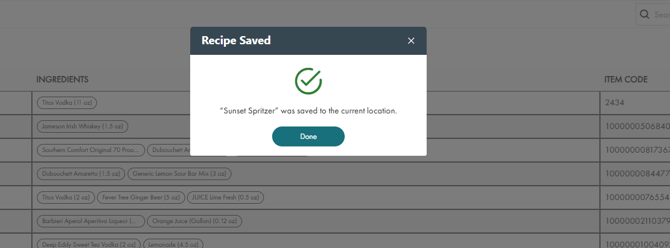
Confirming the recipe was created
Back on the Recipes tab, search for the recipe by name (or scroll the list) to confirm it appears with its ingredients, size, and price.

Deleting a recipe
1. On the Recipes tab, find the recipe you want to remove.
2. Click the trash icon in the **Actions** column for that row.
3. Confirm the deletion in the dialog that appears — *"Delete drink recipe '\[name\]'?"*
4. Click **Yes**. The recipe is removed immediately and a confirmation message appears at the top of the screen.

- [Bars and Restaurants](https://support.beerboard.com/knowledge/bars-and-restaurants?hsLang=en#main-content)
- [SmartBar](https://support.beerboard.com/knowledge/bars-and-restaurants?hsLang=en#smartbar)
- [Product Management](https://support.beerboard.com/knowledge/bars-and-restaurants?hsLang=en#product-management)
- [Yield Management](https://support.beerboard.com/knowledge/bars-and-restaurants?hsLang=en#yield-management)
- [BeerBoard TV](https://support.beerboard.com/knowledge/bars-and-restaurants?hsLang=en#beerboard-tv)
- [SmartBar Mobile App](https://support.beerboard.com/knowledge/bars-and-restaurants?hsLang=en#smartbar-mobile-app)
- [BeerBoard P@Y](https://support.beerboard.com/knowledge/bars-and-restaurants?hsLang=en#beerboard-py)
- [SmartMenus](https://support.beerboard.com/knowledge/bars-and-restaurants?hsLang=en#smartmenus)
- [SmartOrders](https://support.beerboard.com/knowledge/bars-and-restaurants?hsLang=en#smartorders)
- [Integrations Setup](https://support.beerboard.com/knowledge/bars-and-restaurants?hsLang=en#integrations-setup)
- [New SmartBar](https://support.beerboard.com/knowledge/bars-and-restaurants?hsLang=en#new-smartbar)
- [BevBox](https://support.beerboard.com/knowledge/bars-and-restaurants?hsLang=en#bevbox)
- [Beer Tour](https://support.beerboard.com/knowledge/bars-and-restaurants?hsLang=en#beer-tour)
- [General FAQs](https://support.beerboard.com/knowledge/general-faqs?hsLang=en#main-content)
- [SmartBar](https://support.beerboard.com/knowledge/general-faqs?hsLang=en#smartbar)
- [SmartOrders](https://support.beerboard.com/knowledge/general-faqs?hsLang=en#smartorders)
- [Claim Your Brand](https://support.beerboard.com/knowledge/claim-your-brand?hsLang=en#main-content)
- [Distributors, Wholesalers, and Suppliers](https://support.beerboard.com/knowledge/claim-your-brand?hsLang=en#distributors-wholesalers-and-suppliers)
- [Claim Your Brand FAQs](https://support.beerboard.com/knowledge/claim-your-brand?hsLang=en#claim-your-brand-faqs)
- [Suppliers, Distributors, and Wholesalers](https://support.beerboard.com/knowledge/suppliers-distributors-and-wholesalers?hsLang=en#main-content)
- [SmartOrders](https://support.beerboard.com/knowledge/suppliers-distributors-and-wholesalers?hsLang=en#smartorders)
- [Insights](https://support.beerboard.com/knowledge/suppliers-distributors-and-wholesalers?hsLang=en#insights)
- [General FAQ](https://support.beerboard.com/knowledge/suppliers-distributors-and-wholesalers?hsLang=en#general-faq)
- [BeerBoard P@Y](https://support.beerboard.com/knowledge/suppliers-distributors-and-wholesalers?hsLang=en#beerboard-py)
[](https://www.beerboard.com/)
225 W Jefferson St, Syracuse, NY 13202
Copyright © 2025, BeerBoard